Easy Ways to Bring Assistive Technology Into Your Classroom
Free or low-cost tools can help all students—with and without learning differences—better access course content.
Your content has been saved!
Go to My Saved Content.Teachers put a lot of time and effort into designing classroom activities that encourage students to read, write, communicate, play, move, and socialize. They strive to ensure that all students have opportunities to grow and learn, but children with disabilities can face barriers to their participation in classroom activities. To lower those barriers, teachers can access a set of tools—collectively called assistive technology—that have been designed to help these students participate fully and naturally in inclusive learning environments.
Assistive technology (AT) is “any item, piece of equipment, or product system, whether acquired commercially off the shelf, modified, or customized, that is used to increase, maintain, or improve functional capabilities of individuals with disabilities.” AT includes a wide variety of no-tech, low-tech, and high-tech tools. Some assistive technology tools cost nothing, and others can be fairly inexpensive. Many teachers are using some tools that function as AT—even if they don’t think of them that way.
Simple Ways to Incorporate Assistive Technology
Closed-captioning in videos: Adding or turning on closed-captioning in all videos, including YouTube and GoNoodle, assists students in making connections between text and audio representations of language. Captioning is an assistive technology tool that is free and easy to use: simply push the CC button underneath a video.
Closed-captioning provides missing information for individuals who have difficulty processing speech and auditory components of visual media. It is crucial for students who are hard of hearing and can support students’ reading skills.
Graphic organizers: Graphic organizers are a no-tech AT tool that offers a simple, effective way to provide writing support to elementary, middle, and high school students who have dysgraphia, executive function challenges, and other learning challenges.
Students with executive function challenges who struggle with organization, for example, can benefit from the visual organization of their thoughts and ideas, and graphic organizers “clarify implicit relationships contained in the text in a way that text alone may not.” Likewise, students with dysgraphia—which affects handwriting and fine motor skills, word spacing, and the general ability to put ideas and thoughts onto paper—can benefit from graphic organizers.
This tool can help struggling writers show what they know and organize their thoughts before they start to write, which can make writing less intimidating. Having printed graphic organizers available in your classroom for all students is an easy way to provide an assistive technology tool to struggling writers of all ages.
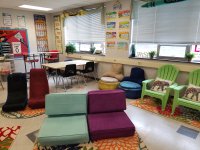
Classroom seating: To help students focus their attention in order to learn, it’s helpful if teachers are able to provide a variety of seating options in the classroom. Examples of supported seating include beanbag chairs, yoga balls, wobble stools, carpet squares, and wedges for active sitting, which is “seating that naturally encourages us to stay in motion, rather than passively relaxing into a slouch or attempting to rigidly hold a ‘correct’ pose.”
My daughter’s fifth-grade classroom has a variety of seating options, and one of her favorite seats looks like an old wooden train bench with pillows. Her third-grade classroom had a reading corner with beach chairs. Metal chairs arranged in rows don’t need to be the only seating choice in our classrooms, and involving students in the seating design process—by having them help arrange the room or develop the norms for using the options, for example—can create excitement and engagement.
Visual timers: Time can be abstract for students with executive function challenges or autism. Students may become anxious when a teacher says, “You have 10 minutes left to work on this test.” Using a visual timer—a device that makes the concept of time easier to understand and monitor by providing a clear indication of the time remaining and elapsed for tasks—can help students prepare for transitions and ease test anxiety as they are able to see at a glance how much time is left.
Teachers can place a physical visual timer on their desk or elsewhere at the front of the classroom, or project one on their interactive whiteboard during timed class activities, projects, or tests.
Speech-to-text software: Students with print disabilities such as dyslexia can struggle when producing written assignments. However, if your classroom uses Google Docs, all of your students—those with and without disabilities—have access to an important free tool called voice typing, which is found under the Tools tab. (Dragon Dictation and VoiceNote are similar tools that are also worth trying.)
Speech-to-text is a form of assistive technology that allows students—and teachers—to dictate into their computer and watch their words appear as text on the computer screen, without typing. I’ve found that students with and without disabilities like using this tool.
Teachers may want to create a space for voice typing in a corner of the classroom, where classroom sounds won’t be picked up by the computer microphone. If all students have the opportunity to rotate through this area, voice typing should not carry any stigma.
