Intermediate Level Projects with Scratch: Random Shapes On Demand!
Your content has been saved!
Go to My Saved Content.Through a renewed interest around in-class computer programming, campaigns like the Hour of Code have brought active support to millions of users trying programming for the first time. A host of other free tools are also making it easier than ever for people to learn coding. Not only does programming present an important economic opportunity for young people, but it's also an exciting and interactive medium for them to express themselves creatively.
The most popular of these new tools for learning creative computing is Scratch, developed by the Lifelong Kindergarten Group at the MIT Media Lab. Scratch's graphic drag-and-drop code blocks snap together like LEGO bricks and provide students with an exciting opportunity to experience computer programming by coding their own stories, animations, and games.
In our first tutorial, we practiced programming by using code to draw 2D geometric shapes -- content that might be covered in a second or third grade math class. To build on that, this next tutorial will introduce other core computational thinking concepts like conditional statements (if/then), functions, and using data with variables. This time we'll teach the computer to randomly draw regular polygons on demand in a fun activity we're calling The Magic Polygon Pencil.
Here’s How
Scratch Revisited
- Visit scratch.mit.edu.
- If you haven't already, sign up for an account by clicking on "Join Scratch" at the top right of your browser window. This isn't required to actually use Scratch, but it's necessary if you want to save your work.
- Click the "Create" button near the top left of your browser window to start a new project.
- In our beginner tutorial, we got to know the layout of the Scratch interface. Check it out if you need a primer on the four main areas of the program: the Stage, Sprite List, Palette, and Scripts Area.
Main Challenge: Make a sprite that draws random polygons.
- Name your variable "SideLength".
- Click OK to continue.
- Make one more variable and name it "NumberOfSides".
- Think of a variable as simply a container for a value. For example, a scoreboard has variables that contain points.

How It Works
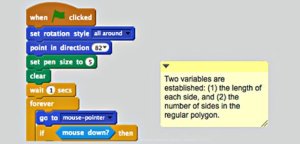
- The "When Green Flag Clicked" block is called an event block. Events are starting blocks needed to activate the entire sequence of code blocks.
- The next five blocks before the "Forever" block are just for general aesthetics, and teach the Pencil sprite how it should look and act as it draws. We set the pen width and rotation style as you can see in the preceding screenshot.
- The "Forever" block is another loop. It allows the Pencil sprite do whatever instructions are inside over and over again.
- The first thing inside that "Forever" loop is a command called "Go To: Mouse-Pointer". This makes the sprite follow the cursor wherever it goes.
- Next we meet conditional testing in the form of an if/then block. It tells the sprite, "If the user clicks the mouse (or trackpad) button down, then run this code inside." If we’re not clicking, the if/then won't execute the code.
- Next the "Pick Random" blocks randomly set the side length and number of sides that our new polygon will have. It's important to set the minimum number to 3, since polygons need at least that many sides and vertices.
- Next we allow the sprite to draw on the Stage by using the "Pen Down" block.
- Now we use our newly set variables in a "Repeat" block. The Pencil sprite will draw a side length defined in the "Move" block and then "Turn" the necessary number of degrees before repeating the process as many times as there are sides. We know that the five exterior angles will split into equal shares of the 360-degree turn, so we can fill in the division operator to read:
- The "Pen Up" block prevents the sprite from leaving a trail until the user clicks on the Stage again.
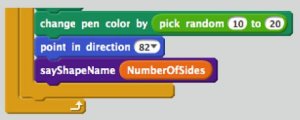
- Next the "Change Pen Color By" will make sure that the next polygon is a different color.
- Finally, the "Point In Direction" makes sure that the Pencil sprite is properly presented upright once it's finished drawing.
That's all it takes to code a little unpredictable art into your day! If your students want to push the limit, challenge them to build a custom code block displaying the name of the shape that was just randomly drawn. "Make A Block" is how Scratch enables an important computational practice of creating reusable custom procedures or functions.
New Challenge: Make your own block that displays the polygon's name.
- Click "Add a Number Input".
- Type the word "sides" to replace "number1".
- Click "OK" to continue.
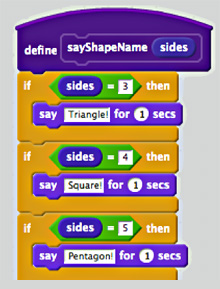
You've made a block, but . . . what does it do? Nothing yet! You've got to define what it does before it will be usable.

How It Works
When you feed your "sayShapeName" block the "NumberOfSides" value, it uses that value to determine the shape name by checking a series of if/then tests that you have programmed.

Wrapping Up
By now, your code vocabulary has grown to include core computational thinking principles like sequences, events, loops, operators, conditionals, functions, and data. If you're still hungry for more, my next post will deliver a more advanced project for teaching programming and math concepts. Until then, please explore some other Make a Block tutorials curated by the Scratch team.
And don't forget to explore some other Scratch educator resources:
- Visit the ScratchEd website, a community of educators that help each other learn and use Scratch. You can find lessons, activities, project ideas, or answers by friendly fellow educators.
- The Creative Computing Workshop is a free online workshop where you can learn more about using Scratch and supporting computational thinking.
- Scratch Day is a worldwide network of gatherings where Scratchers meet up, share projects and experiences, and learn more about Scratch. Great for kids and adults!
- The Magic Polygon Pencil is the link where you can find the full code for this project.
